
How to Position Stereo Speakers and the Listening Seat
Set up stereo speakers with a repeatable process for listening position, symmetry, distance, height, wall clearance and toe-in—before spending money on treatment or EQ.
Learn & Fix · Room and placement
Before buying room correction, acoustic panels or a different pair of speakers, fix the geometry. A tape measure and 30 minutes of controlled listening can change stereo focus, tonal balance and bass more than many component swaps.
The short answer
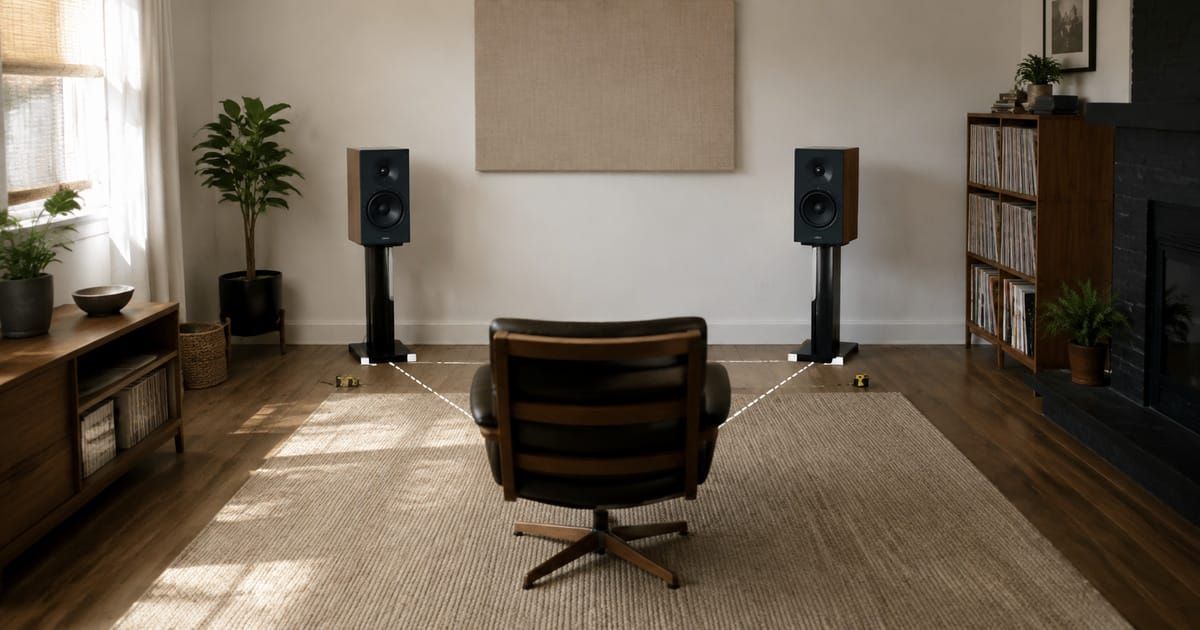
Start with a symmetrical 60-degree stereo triangle: the two speakers and the main listening position should be roughly the same distance apart. Put both acoustic axes near seated ear height, give each speaker the same surroundings, and begin with equal toe-in. Then change only one variable at a time—seat position, distance from the front wall, speaker spacing or toe-in—and keep the position that solves a specific problem.
Verified fact Supported by a current standard or manufacturer guidance.
Editorial calculation A transparent estimate from stated dimensions, not an in-room measurement.
Practical starting point A repeatable experiment, not a universal specification.
Why placement comes before correction
A stereo system creates a phantom soundstage from the timing, level and spectrum arriving from two loudspeakers. If the left speaker is closer, aimed differently or surrounded by different reflective surfaces, the two channels no longer reach the listener under comparable conditions. A centered voice may pull sideways; instruments may lose stable positions; one side may sound brighter or heavier.
Low frequencies add another problem. Sound reflected by the wall behind a speaker can return out of phase with the direct sound and create a deep cancellation. Room modes can also make the listening seat land near a bass peak or null. Equalization can reduce some peaks, but it cannot reliably repair every geometric cancellation. Genelec explicitly notes that boosting a wall-cancellation notch does not solve it because the direct and reflected components are changed together.
Verified fact: ITU-R BS.775-4 is the current ITU recommendation for multichannel stereophonic systems. Its reference geometry places the left and right front channels symmetrically around the center direction. Genelec's placement guidance expresses the same stereo baseline more simply: a 60-degree angle between left and right monitors, aimed at the listening position.
Step 1: choose the listening position first
The sofa is often treated as immovable while the speakers are adjusted around it. That can make setup unnecessarily difficult. The seat is one of the three points in the stereo triangle, and moving it forward or backward changes both imaging geometry and low-frequency response.
Do not begin with your head against the rear wall if the room gives you another option. Boundaries are pressure maxima for several room modes, so a rear-wall seat often exaggerates some bass notes while others remain weak. Genelec's studio-oriented guidance recommends keeping the listening position at least one metre from walls. That is a useful reference, not a requirement for every living room.
Keep the main seat on the room's left-right centerline when practical. This makes the side-wall distances and reflection paths more similar. Avoid placing the listening position exactly halfway between floor and ceiling; Genelec warns against half-room-height placement because ceiling-related low-frequency effects can become unfavorable.
Step 2: build a 60-degree stereo triangle
Place the speakers so the distance between them is approximately equal to the distance from either speaker to the listening position. Seen from above, this forms an equilateral triangle and gives a 60-degree angle between the speakers at the listener.
For example, if the acoustic centers are 2.2 metres apart, begin with the listening position about 2.2 metres from each speaker. Measure to the same reference point on both cabinets—normally the front baffle near the tweeter or coaxial driver—not to whichever cabinet corner is easiest to reach.
KEF's consumer guidance uses a slightly looser range: the listening distance can be about 1 to 1.2 times the distance between the speakers. This is a useful reminder that the triangle is a baseline, not a sacred shape. Room width, speaker directivity and the number of listeners may justify a slightly longer triangle.
| What you hear | Likely geometric cause | First adjustment |
|---|---|---|
| Strong center but narrow soundstage | Speakers too close together for the seat distance | Move speakers outward equally in 5–10 cm steps |
| A gap or weak center image | Speakers too far apart or too little toe-in | Move speakers inward or add equal toe-in |
| Center image pulls left or right | Unequal path length, level, angle or nearby reflections | Re-measure distances before changing balance control |
| Image changes when you move your head slightly | Very narrow directivity, excessive toe-in or strong early reflections | Reduce toe-in slightly and check side-wall symmetry |
Step 3: set height and keep the path clear
Use the acoustic axis specified by the loudspeaker maker. On many conventional two-way speakers this is near the tweeter; on coaxial designs it is near the center of the coaxial driver. Put that axis close to seated ear height, or tilt the cabinet according to the manual.
Genelec gives 1.2–1.4 metres from the floor as a typical seated-ear range for two-way monitors and advises aiming the speakers at the listening position. Dolby likewise tells users to choose a central seat, aim speakers toward it and keep the relevant speakers at seated ear height unless a layout guide says otherwise.
Keep furniture, monitor screens and cabinet edges out of the direct path. If the woofer or tweeter is partly hidden by a desk or shelf, the blockage and nearby reflection can change the response. Use stable stands where possible, and secure tall stands or floorstanders if children or pets can reach them.
Step 4: make the left and right sides genuinely similar
Equal tape-measure distances are necessary but not always sufficient. A bare window beside the left speaker and an open doorway beside the right speaker do not behave alike. Nor do a speaker squeezed beside a cabinet and one radiating into open space.
Verified fact: Genelec says the most accurate stereo imaging occurs when reflections are similar for the two speakers. Its recommended conditions include equal distances to the nearest side wall and the wall behind each speaker, equal height, and a listening position on the room's left-right symmetry axis.
Practical starting point: Match the obvious conditions first. Use similar stand height, equal distance from the front wall, equal distance from side boundaries when possible, and the same toe-in. If one side has glass, try a curtain during critical listening. If one side is open, a small amount of additional toe-in may make the direct sound more dominant, but treat that as an experiment rather than a guaranteed correction.
Step 5: do not copy a universal wall-distance rule
“Always pull speakers far into the room” and “always put speakers close to the wall” are both incomplete. The better position depends on the speaker's radiation pattern, low-frequency extension, port clearance, crossover to a subwoofer, room dimensions and the frequencies at which wall reflections cancel.
Genelec explains the underlying relationship: when the distance to the wall corresponds to one quarter of a wavelength, the reflected sound can return out of phase and create a notch. The company gives an example in which a monitor front 86 cm from the wall produces a first cancellation near 100 Hz.
Editorial calculation
Using a sound speed of about 343 m/s, the first quarter-wave cancellation estimate is frequency ≈ 343 ÷ (4 × distance in metres). At 0.86 m, that is about 100 Hz. Real depth depends on wall reflectivity, cabinet radiation and the room, so the formula predicts a risk area—not the finished response.
For many Genelec monitors, the company's own guidance is to keep the front of the monitor less than 60 cm from the wall, while maintaining at least 5 cm clearance for a rear port, then compensate the boundary-related bass rise with the speaker's controls or calibration. That is product-family guidance, not a universal instruction for every passive speaker.
KEF's consumer guides illustrate the model dependence: one guide suggests at least 50 cm from side walls for many speakers, while another recommends testing roughly 30–100 cm from the wall behind the speaker. Always check the exact manual before copying a generic distance.
A sensible home experiment
- Start at the maker's minimum clearance, with both speakers equally placed.
- Mark the floor so you can return to the starting position.
- Move both speakers by the same 10–15 cm amount.
- Replay a familiar bass line and a centered vocal at the same volume.
- Keep the position that improves bass evenness without weakening the center image.
Step 6: treat toe-in as a model-specific control
Toe-in changes the angle at which you hear the loudspeaker and the direction of its strongest high-frequency output. More toe-in often strengthens focus and reduces energy aimed at the side walls; less toe-in can widen the useful seating area. The exact result depends on the speaker's off-axis response.
Begin with the two speakers aimed directly at the main seat unless the manual says otherwise. Listen to a mono voice. Then rotate both speakers outward by the same small amount—about 2–5 degrees—and compare image focus, brightness and the width of the usable listening area.
KEF is a good example of why one rule does not fit every design. Its Uni-Q guidance recommends beginning with the speakers facing straight into the room and generally using no more than slight toe-in, because the coaxial design is intended to provide broad, even coverage. A conventional narrow-directivity speaker may need a different starting angle.
Step 7: control the first obvious reflections
You do not need to turn a living room into a recording studio. Start by removing the worst asymmetries and hard, empty surfaces. Dolby's setup guidance recommends a clear path from speakers to listener, small placement experiments, and reducing large areas of bare wall and floor when the room sounds unbalanced.
Practical starting point: Sit at the listening position while another person moves a mirror along the side wall. Where you can see a speaker in the mirror is a first-reflection area. A thick absorber can reduce that reflection, but a curtain, bookcase or a different speaker angle may be the more acceptable home solution. A thin decorative foam tile will not act as a broadband bass treatment.
Use treatment to solve an identified problem. Too much high-frequency absorption can make the room dull while leaving low-frequency decay untouched. Rugs, curtains and soft furniture mainly affect mid and high frequencies; thick porous treatment and bass traps are required to reach substantially lower.
A repeatable 30-minute setup
- Disable variables. Turn off room correction, loudness, bass boost and channel balance offsets. Set both speakers to the same switches or boundary settings.
- Place the seat. Keep it centered and away from the rear wall when practical.
- Build the triangle. Measure equal speaker-to-seat distances and begin near a 60-degree included angle.
- Match height. Put both acoustic axes at the same seated-ear height and keep a clear path.
- Match boundaries. Make front- and side-wall distances as equal as the room allows.
- Set toe-in. Begin with the maker's recommendation; otherwise aim at the seat and reduce equally in small steps.
- Test one variable at a time. Use the same mono voice, sparse stereo recording and bass passage at the same volume.
- Mark and record. Tape the preferred locations and note distances, angles and any speaker boundary controls.
- Calibrate last. Run room correction only after the physical geometry is stable.
Fast diagnosis by symptom
| Symptom | Check before buying anything | What not to assume |
|---|---|---|
| Loose or wandering center vocal | Equal distance, equal toe-in, polarity and side-wall symmetry | That the DAC or amplifier lacks “imaging” |
| One-note or boomy bass | Move the seat forward/back, then test speaker-wall distance | That more absorption at high frequencies will fix a room mode |
| Thin bass around one range | Test for speaker-boundary cancellation by changing front-wall distance | That a large EQ boost will fill a deep null safely |
| Bright, hard sound | Toe-in, bare side walls, glass, floor reflection and listening distance | That a different cable is the first remedy |
| Wide soundstage but weak center | Reduce speaker spacing or increase equal toe-in | That wider is automatically more accurate |
| Good at one seat, poor everywhere else | Reduce toe-in, check directivity and consider multiple-subwoofer strategy for bass | That a single correction curve can make every seat identical |
Where measurement helps—and where it does not
A calibrated measurement microphone can reveal frequency-response peaks, nulls, arrival-time differences and decay problems that are hard to separate by ear. It is especially useful for comparing two nearby positions under the same conditions.
A phone microphone can still help with coarse relative comparisons, but its low-frequency accuracy, automatic processing and calibration are usually unknown. Do not publish or trust a phone trace as an absolute laboratory measurement.
Room correction is most effective after placement has removed avoidable asymmetry and major cancellations. Use correction to refine the response, not to justify leaving one speaker in a corner and the other in open space. If a deep null moves or disappears when the speaker or seat moves, geometry is the more direct fix.
Common questions
Should the speakers be as far apart as possible?
No. Excessive spacing can create a hole in the middle. Begin with a 60-degree triangle and widen only while a stable center image remains.
Must the tweeter always be exactly at ear height?
Use the manufacturer's acoustic-axis guidance. Ear height is a strong starting point for many conventional speakers, but some designs are intended to sit above or below the listener and be tilted.
Are rear-ported speakers forbidden near a wall?
No. Port clearance and tonal balance are model-specific. A rear port needs enough space to operate, but the larger wall-distance question also involves boundary gain and reflection cancellation. Follow the manual and test both bass level and bass evenness.
Should the listening seat be exactly 38% of the room length?
Not as a universal rule. A percentage can be a search starting point, but doors, openings, ceiling height, construction, furniture and speaker position all change the result. Measure or listen in several nearby positions.
Can room correction fix poor stereo symmetry?
It may reduce some tonal differences and compensate delay, but it cannot make unequal reflection patterns physically identical. Fix distance, angle and obvious boundary differences first.
Bottom line
Good stereo placement is not a single magic distance. It is a controlled sequence: choose the seat, create a symmetrical triangle, match height and boundaries, test wall distance, adjust toe-in for the actual speaker, then calibrate. Record each change so preference does not become guesswork.
Before changing electronics, confirm the electrical side with the amplifier-to-speaker matching guide. If a subwoofer is part of the system, use the two-channel subwoofer integration guide. The System Builder, System Builder and product database can then connect the room requirements to actual equipment.
Continue the research
Move from this article to a verified product decision
Use descriptive links to move between product records, brand evidence, comparisons, setup or issue guidance, and compatible-system tools. Inclusion reflects subject relevance, not a score or endorsement; product facts, recommendation eligibility, and commercial links remain separate.
Product page
Verify the exact model
Brand center
Check the wider platform
Related comparison
Compare the system role
Setup, firmware & problems
Check behavior before buying
System Builder & compatibility